Introduction
Over the past week, I’ve been diving into the implementation of the research paper "Old Photo Restoration via Deep Latent Space Translation." While I haven’t yet completed the full pipeline, the journey so far has been incredibly insightful—especially in understanding the role of data augmentation in building effective models.
One of the key challenges in training models for tasks like photo restoration is the lack of diverse, labeled data. That’s where data augmentation comes in. By synthetically generating variations of images, we can simulate real-world conditions like noise, scratches, and aging effects—ultimately helping the model learn more robust representations.
In this blog, I’ll walk through how you can use OpenCV—a powerful and flexible computer vision library—to apply custom augmentations for your datasets. Whether you're building a model to restore vintage photos, detect defects, or simply want to make your model generalize better, this guide will help you get started with creating your own augmented datasets from scratch.
Why the need of data augmentation ?
When working on real-world machine learning projects—especially in the field of image restoration or enhancement—it’s often very difficult to find datasets that perfectly match your specific use case. The problem becomes even more evident when you're dealing with niche tasks like restoring old, damaged photographs. Public datasets may be too clean, limited in diversity, or not representative of the actual defects you want to tackle.
So, why not create the data yourself?
That’s exactly what I aimed to do. Since the end goal is to train a model capable of fixing issues like blur, scratches, holes, and aging artifacts, I needed to first simulate those defects in otherwise clean, high-quality images. This approach allows the model to see a wide variety of damage patterns during training, improving its ability to generalize and restore real degraded images later on.
Using OpenCV, I generated synthetic damage that mimics what you'd find in old photographs. This included:
- Adding motion and Gaussian blur to simulate camera shake or aging lenses.
- Drawing random white and black lines to replicate scratches or tears
- Creating irregular masked regions to simulate holes or missing parts of the photo
- Applying noise and color degradation to mimic the aging process.
Reduce image quality:
class RandomJPEGCompression(object):
def __init__(self, quality_range=(30,100)):
	self.quality_range = quality_range

def __call__(self, img):
	quality = random.randint(*self.quality_range)
	buffer = io.BytesIO()
	img.save(buffer, format='JPEG', quality=quality)
	buffer.seek(0)
	compressed_img = Image.open(buffer)
	return compressed_img

transform = transforms.Compose([
transforms.Resize((224,224)),
RandomJPEGCompression(quality_range=(60,100)),
transforms.ToTensor(),
])

img_path = "0786.png"
image = Image.open(img_path)

# Apply the transform
transformed_image = transform(image)
#View Image
imshow(transformed_image, normalize=False)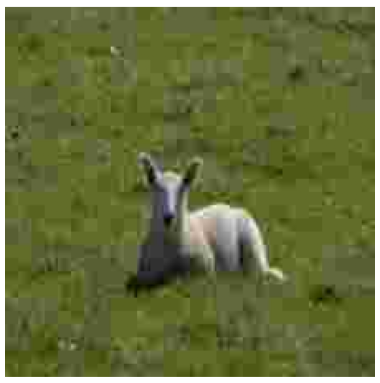
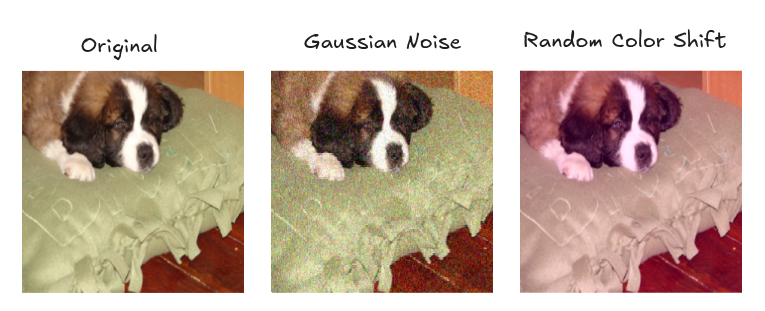
The RandomJPEGCompression class simulates image degradation by applying JPEG compression with a randomly selected quality factor. This quality factor is sampled from a defined range — in this case, between 30 and 100. Lower quality values introduce more compression artifacts, effectively degrading the image.
Similarly here are some more transformations I used:
class AddGaussianNoise(object):
def __init__(self, min_std=5, max_std=50):
	self.min_std = min_std
	self.max_std = max_std

def __call__(self, tensor):
	std = random.uniform(self.min_std, self.max_std) / 255.0
	noise = torch.randn_like(tensor) * std
	tensor = tensor + noise
	tensor = torch.clamp(tensor, 0., 0.7)
	return tensor

class RandomGaussianBlur(object):
def __init__(self, kernel_sizes=[3,5,7], sigma_range=(1.0,5.0)):
	self.kernel_sizes = kernel_sizes
	self.sigma_range = sigma_range

def __call__(self, img):
	kernel_size = random.choice(self.kernel_sizes)
	sigma = random.uniform(*self.sigma_range)
	return F.gaussian_blur(img, kernel_size=kernel_size, sigma=sigma)

class RandomColorShift(object):
def __init__(self, shift_range=(-20,20)):
	self.shift_range = shift_range

def __call__(self, img):
	r_shift = random.randint(*self.shift_range)
	g_shift = random.randint(*self.shift_range)
	b_shift = random.randint(*self.shift_range)

	r, g, b = img.split()
	r = r.point(lambda i: max(0, min(255, i + r_shift)))
	g = g.point(lambda i: max(0, min(255, i + g_shift)))
	b = b.point(lambda i: max(0, min(255, i + b_shift)))

	return Image.merge('RGB', (r, g, b))

class RandomBoxBlur(object):
def __init__(self, radius_range=(1,5)):
	self.radius_range = radius_range

def __call__(self, img):
	radius = random.uniform(*self.radius_range)
	return img.filter(ImageFilter.BoxBlur(radius))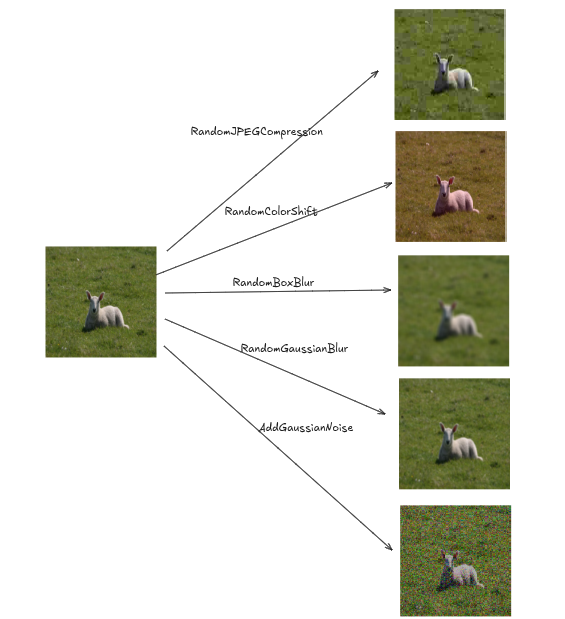
- AddGaussianNoise: This class adds Gaussian noise to an image tensor with a randomly selected standard deviation. The noise simulates sensor or transmission distortions, making the model robust to real-world noisy inputs.
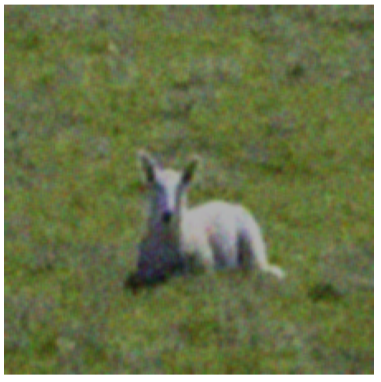
- RandomGaussianBlur: Applies Gaussian blur with a randomly chosen kernel size and sigma value. This mimics out-of-focus effects or motion blur, helping the model generalize to blurry or degraded images.
- RandomColorShift: Randomly shifts the RGB color channels within a specified range. This augmentation simulates lighting or color balance issues often found in aged or scanned photographs.
- RandomBoxBlur: Applies a box blur (averaging filter) with a random radius. It serves as a fast and simple approximation of blur, simulating lens imperfections or printing artifacts.
Applying all transformations together
transform = transforms.Compose([
transforms.Resize((224,224)),
RandomJPEGCompression(quality_range=(60,100)),
RandomColorShift(shift_range=(-20,20)),
RandomBoxBlur(radius_range=(1,5)),
transforms.ToTensor(),
AddGaussianNoise(min_std=5, max_std=50),
RandomGaussianBlur(kernel_sizes=[3,5,7], sigma_range=(1.0,5.0)),
])
To complete the effect of simulating aged or damaged photographs, we introduce one final augmentation technique: adding scratches and holes. These artifacts are common in old physical prints due to wear and tear over time.
from __future__ import print_function
import cv2 as cv

alpha = 0.5
raw_input = input
print(''' Simple Linear Blender
-----------------------
* Enter alpha [0.0-1.0]: ''')

input_alpha = float(raw_input().strip())
if 0 <= alpha <= 1:
alpha = input_alpha
# [load]
src1 = cv.imread(cv.samples.findFile('path to scratches background'))
src2 = cv.imread(cv.samples.findFile('original high res image'))
#cv.imread(images_final[10])
height, width = src1.shape[:2]

# Resize src2 to match src1
src2_resized = cv.resize(src2, (width, height))

# [load]
if src1 is None:
print("Error loading src1")
exit(-1)
elif src2 is None:
print("Error loading src2")
exit(-1)
# [blend_images]
beta = (1.0 - alpha)
dst = cv.addWeighted(src1, alpha, src2_resized, beta, 0.0)
dst_rgb = cv.cvtColor(dst, cv.COLOR_BGR2RGB)
cv.imwrite('old_scratched_pics/test_2.png', dst_rgb)
plt.imshow(dst_rgb)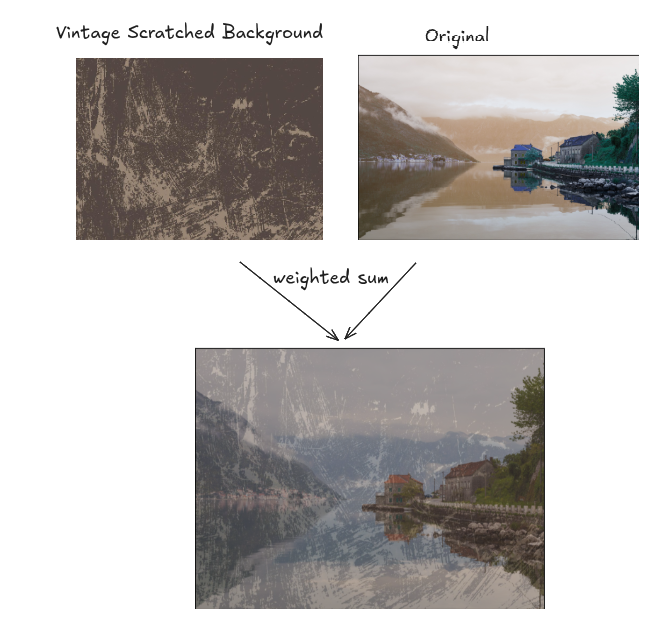
Summary:
Data augmentation plays a crucial role in training models that are robust, generalizable, and capable of handling real-world imperfections. By simulating common defects found in old or degraded images—such as noise, blur, compression artifacts, and color shifts—we can effectively enhance our dataset and prepare our models for real restoration tasks. Leveraging OpenCV and PyTorch transforms, we can build a powerful synthetic data pipeline that not only enriches model training but also deepens our understanding of image processing techniques. Whether you're restoring vintage photos or tackling other computer vision challenges, thoughtful augmentation can be a game-changer.