Introduction
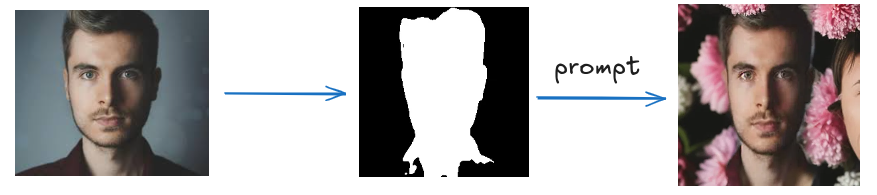
In recent years, AI-powered image editing has seen remarkable advancements. One of the most exciting techniques in this field is inpainting—a process that intelligently fills in missing or removed parts of an image, seamlessly blending them with the surroundings. In this blog, I’ll walk you through my journey of building an AI-powered image segmentation and inpainting pipeline. The goal? To detect people in images, remove boring backgrounds, and then use deep learning-based inpainting to generate some fun backgrounds. To achieve this, I leveraged a U-Net model for human segmentation, followed by an inpainting model that intelligently reconstructs the missing background.
In this blog, I’ll take you through the process of training a UNet model for human segmentation, preparing our inpainting model, and seamlessly replacing backgrounds using state-of-the-art AI techniques. Let’s dive in! 🚀
Image Segmentation
As the name suggests, image segmentation is essentially segmenting (dividing) an image into fragments and assigning a label to each of those. This occurs on a pixel level to define the precise outline of an object within its frame and class. Those outlines — otherwise known as the output — are highlighted with either one or more colors, depending on the type of segmentation.
Groups of Image Segmentation:
- Semantic Segmentation: is an approach detecting, for every pixel, the belonging class. For example, in a figure with many people, all the pixels belonging to persons will have the same class id and the pixels in the background will be classified as background.
- Instance Segmentation: is an approach that identifies, for every pixel, the specific belonging instance of the object. It detects each distinct object of interest in the image. For example, when each person in a figure is segmented as an individual object.
- Panoptic Segmentation: combines both semantic and instance segmentation. Like semantic segmentation, panoptic segmentation is an approach that identifies, for every pixel, the belonging class. Moreover, like in instance segmentation, panoptic segmentation distinguishes different instances of the same class.

U-Net Introduction and model training
U-Net :
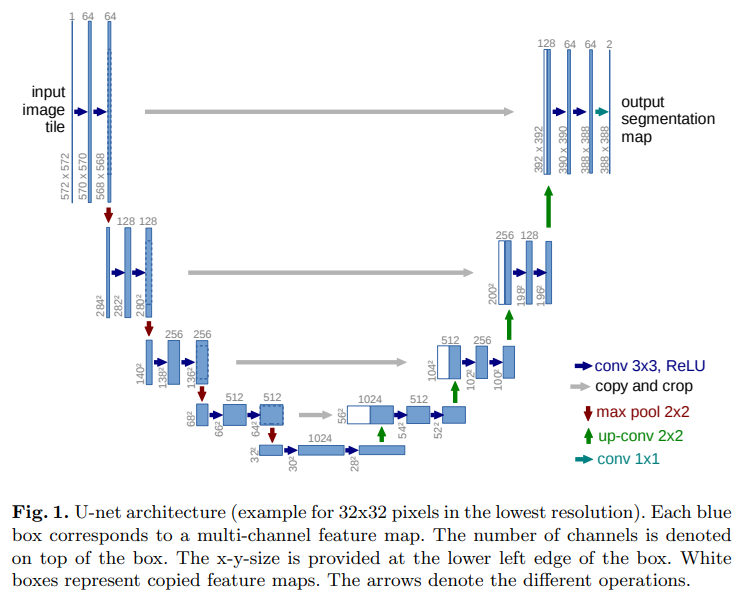
U-Net is a special type of neural network designed for image segmentation, which means identifying exactly which pixels in an image belong to what object or class. It's particularly useful for medical imaging where you need to precisely locate structures like tumors or cells. The network is called U-Net because its architecture looks like a "U" shape:
-
Contracting Path (Left side of U):
- This part works like a regular CNN (Convolutional Neural Network)
- It repeatedly applies two 3×3 convolutions followed by ReLU activation
- After each pair of convolutions, it performs max pooling to reduce the image size
- As the image gets smaller, the network increases the number of features it detects
-
Expansive Path (Left side of U):
- This part gradually increases the image size back to the original dimensions
- It uses upsampling to increase the image size
- It combines detailed location information from the contracting path with the feature information
- This is done through "skip connections" that connect matching layers from both paths
The key innovation of U-Net is how it combines information:
- The contracting path captures WHAT is in the image (features)
- The expansive path figures out WHERE those features are located precisely
- The skip connections help preserve the location details that would otherwise be lost
U-Net requires fewer training images than traditional approaches because:
- It works on small patches of the image rather than the whole image
- This creates many more training examples from limited images
- It can be applied to images of any size once trained
Model Training:
Initializing the U-Net Model Architecture:
class ConvBlock(nn.Module):
    def __init__(self, in_channels, out_channels):
        super(ConvBlock, self).__init__()
        self.conv1 = nn.Conv2d(in_channels, out_channels, kernel_size=3, padding=1)
        self.conv2 = nn.Conv2d(out_channels, out_channels, kernel_size=3, padding=1)
        self.relu = nn.ReLU()

    def forward(self, x):
        x = self.relu(self.conv1(x))
        x = self.relu(self.conv2(x))
        return x

class EncoderBlock(nn.Module):
    def __init__(self, in_channels, out_channels):
        super(EncoderBlock, self).__init__()
        self.conv_block = ConvBlock(in_channels, out_channels)
        self.pool = nn.MaxPool2d(kernel_size=2, stride=2)

    def forward(self, x):
        x = self.conv_block(x)
        p = self.pool(x)
        return x, p

class DecoderBlock(nn.Module):
    def __init__(self, in_channels, out_channels):
        super(DecoderBlock, self).__init__()
        self.upconv = nn.ConvTranspose2d(in_channels, out_channels, kernel_size=2, stride=2, padding=0)
        self.conv_block = ConvBlock(out_channels * 2, out_channels)

    def forward(self, x, skip_connection):
        x = self.upconv(x)
        x = torch.cat((x, skip_connection), dim=1)
        x = self.conv_block(x)
        return x

class UNet(nn.Module):
    def __init__(self, n_classes, img_channels=3):
        super(UNet, self).__init__()

        self.enc1 = EncoderBlock(img_channels, 64)
        self.enc2 = EncoderBlock(64, 128)
        self.enc3 = EncoderBlock(128, 256)
        self.enc4 = EncoderBlock(256, 512)

        self.bottleneck = ConvBlock(512, 1024)

        self.dec4 = DecoderBlock(1024, 512)
        self.dec3 = DecoderBlock(512, 256)
        self.dec2 = DecoderBlock(256, 128)
        self.dec1 = DecoderBlock(128, 64)

        self.final_conv = nn.Conv2d(64, n_classes, kernel_size=1)

    def forward(self, x):
        c1, p1 = self.enc1(x)
        c2, p2 = self.enc2(p1)
        c3, p3 = self.enc3(p2)
        c4, p4 = self.enc4(p3)

        bridge = self.bottleneck(p4)

        d4 = self.dec4(bridge, c4)
        d3 = self.dec3(d4, c3)
        d2 = self.dec2(d3, c2)
        d1 = self.dec1(d2, c1)

        output = self.final_conv(d1)
        return output
Model Training
Using the dataset from: Human Segmentation Dataset
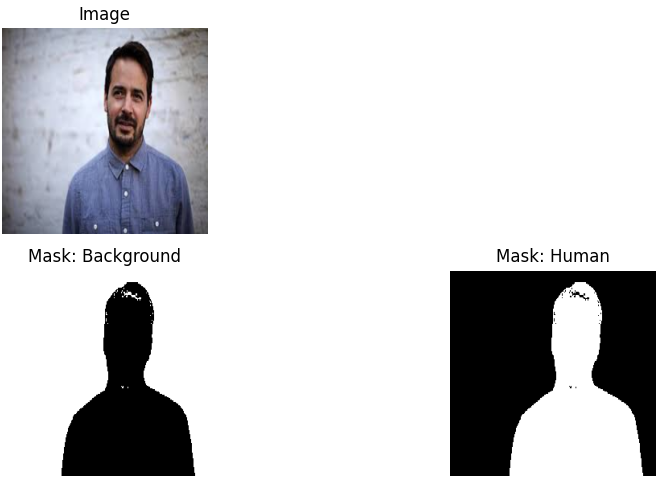
Loading the dataset and visualizing some of the images
IMG_HEIGHT = 256
IMG_WIDTH = 256
N_CLASSES = 2
CLASS_NAMES = ["Background", "Human"]

class SegmentationDataset(Dataset):
    def __init__(self, image_paths, mask_paths, transform=None):
        self.image_paths = image_paths
        self.mask_paths = mask_paths
        self.transform = transform

    def __len__(self):
        return len(self.image_paths)

    def __getitem__(self, idx):
        image = Image.open(self.image_paths[idx]).convert("RGB")
        mask = Image.open(self.mask_paths[idx]).convert("L")

        image = image.resize((IMG_WIDTH, IMG_HEIGHT), Image.BILINEAR)
        mask = mask.resize((IMG_WIDTH, IMG_HEIGHT), Image.NEAREST)

        image = transforms.ToTensor()(image)
        mask = np.array(mask, dtype=np.uint8)
        mask[mask > 0] = 1

        mask = torch.tensor(mask, dtype=torch.long)
        mask = F.one_hot(mask, num_classes=N_CLASSES).permute(2, 0, 1)

        return image, mask.float()

dataset = SegmentationDataset(image_paths, mask_paths)
data_loader = DataLoader(dataset, batch_size=16, shuffle=True, num_workers=4)

def plot_example(image, mask, pred=None):
    plt.figure(figsize=(10, 5))
    ncols = N_CLASSES
    nrows = 2 if pred is None else 3

    image = image.permute(1, 2, 0).numpy()

    plt.subplot(nrows, ncols, 1)
    plt.imshow(image)
    plt.title("Image")
    plt.axis("off")

    for i in range(N_CLASSES):
        mask_channel = mask[i].numpy()
        plt.subplot(nrows, ncols, i + N_CLASSES + 1)
        plt.imshow(mask_channel, cmap="gray")
        plt.title(f"Mask: {CLASS_NAMES[i]}")
        plt.axis("off")

    if pred is not None:
        for i in range(N_CLASSES):
            pred_channel = pred[i].numpy()
            plt.subplot(nrows, ncols, i + N_CLASSES * 2 + 1)
            plt.imshow(pred_channel, cmap="gray")
            plt.title(f"Prediction: {CLASS_NAMES[i]}")
            plt.axis("off")

    plt.tight_layout()
    plt.show()
I have split the dataset into training and validation and loaded them into train_loader and val_loader The model is trained on 500 epochs. In each epoch, the model processes mini-batches from train_loader. For rest of the model training code please refer to this: unet_img_segmentation
Using Segmentation Model and Control Net Inpaint Pipelinedevice = torch.device("cuda" if torch.cuda.is_available() else "cpu")
human_segment = UNet(n_classes=2, img_channels=3)
human_segment.load_state_dict(torch.load("./unet_weights.pth", map_location=device))
human_segment.to(device)
human_segment.eval()
controlnet = ControlNetModel.from_pretrained("lllyasviel/control_v11p_sd15_inpaint", use_safetensors=True)
pipe = StableDiffusionControlNetInpaintPipeline.from_pretrained(
"runwayml/stable-diffusion-v1-5", controlnet=controlnet, use_safetensors=True
).to(device)
pipe.scheduler = UniPCMultistepScheduler.from_config(pipe.scheduler.config)
transform = transforms.Compose([
transforms.Resize((256, 256)),
transforms.ToTensor(),
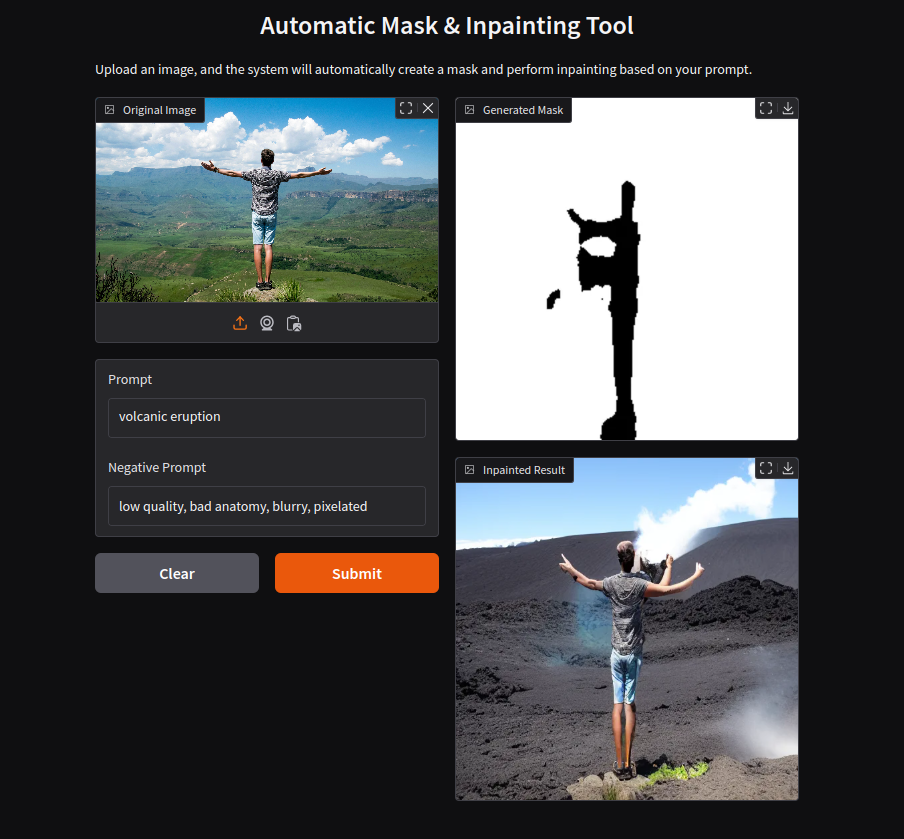
])In this project, I have built a pipeline that seamlessly combines human segmentation and image inpainting to edit images intelligently. The goal is to detect and isolate humans in an image and then use AI-driven inpainting to modify the background creatively.
- Human Segmentation using U-Net
- Once the segmentation mask is created, I invert it so that the human portion becomes transparent while the background remains intact. This step ensures that only the background gets modified in the next stage.
- Image Inpainting with Hugging Face Pipelines
For the entire application code please refere here: Background Edit Application
Limitations and Improvements
For this implementation, I have used smaller models to make the process more lightweight and efficient. However, this comes at the cost of precision, accuracy, and overall image quality. The results may not always be perfect, especially for fine details, edges, or complex backgrounds. By integrating high-resolution segmentation models and advanced inpainting architectures, the pipeline can produce more realistic and visually appealing results.
Additionally, there are several ways to enhance the pipeline:
- Fine-tuning the segmentation model on a larger, more diverse dataset to improve mask precision.
- Using diffusion-based inpainting models with better context-awareness for more natural background reconstruction.
- Adding post-processing techniques such as edge refinement and blending to ensure smoother transitions between the segmented subject and the inpainted background.
This project serves as a foundation for further experimentation, and I encourage you to try different models and techniques to push the limits of AI-driven image editing. 🚀